Capturing the perfect shot often means being both in front of and behind the camera, a feat made simpler with the timer on iPhone camera functionality. This feature enables users to take hands-free photos, providing the flexibility to get into position or capture a group photo without leaving anyone out. Using the picture timer on iPhone ensures everyone can be in the frame, making it an essential tool for photographers of all levels. Whether it’s for a timed photo iPhone session with friends or a solo shot with a scenic backdrop, understanding how to effectively use this feature can significantly enhance photo quality and composition.
In this article
This article will guide readers through the steps to set the timer on their iPhone camera, discuss the best uses for the iPhone camera timer, including utilizing the 10-second timer for more preparation time, and provide tips on stabilizing your iPhone, possibly with an iPhone tripod, for the best hands-free photos. Additionally, common mistakes will be addressed to help avoid common pitfalls associated with timer iphone photo setups. By the end of this guide, readers will be equipped with the knowledge to use the picture timer on iphone effectively, ensuring no moment is missed and every photo is captured just as intended.
How to Set a timer on iPhone Camera
To set a timer on your iPhone camera, allowing you time to join the photo, follow these steps:
Step-by-Step Guide
- Open the Camera App: Launch the native camera application on your iPhone.
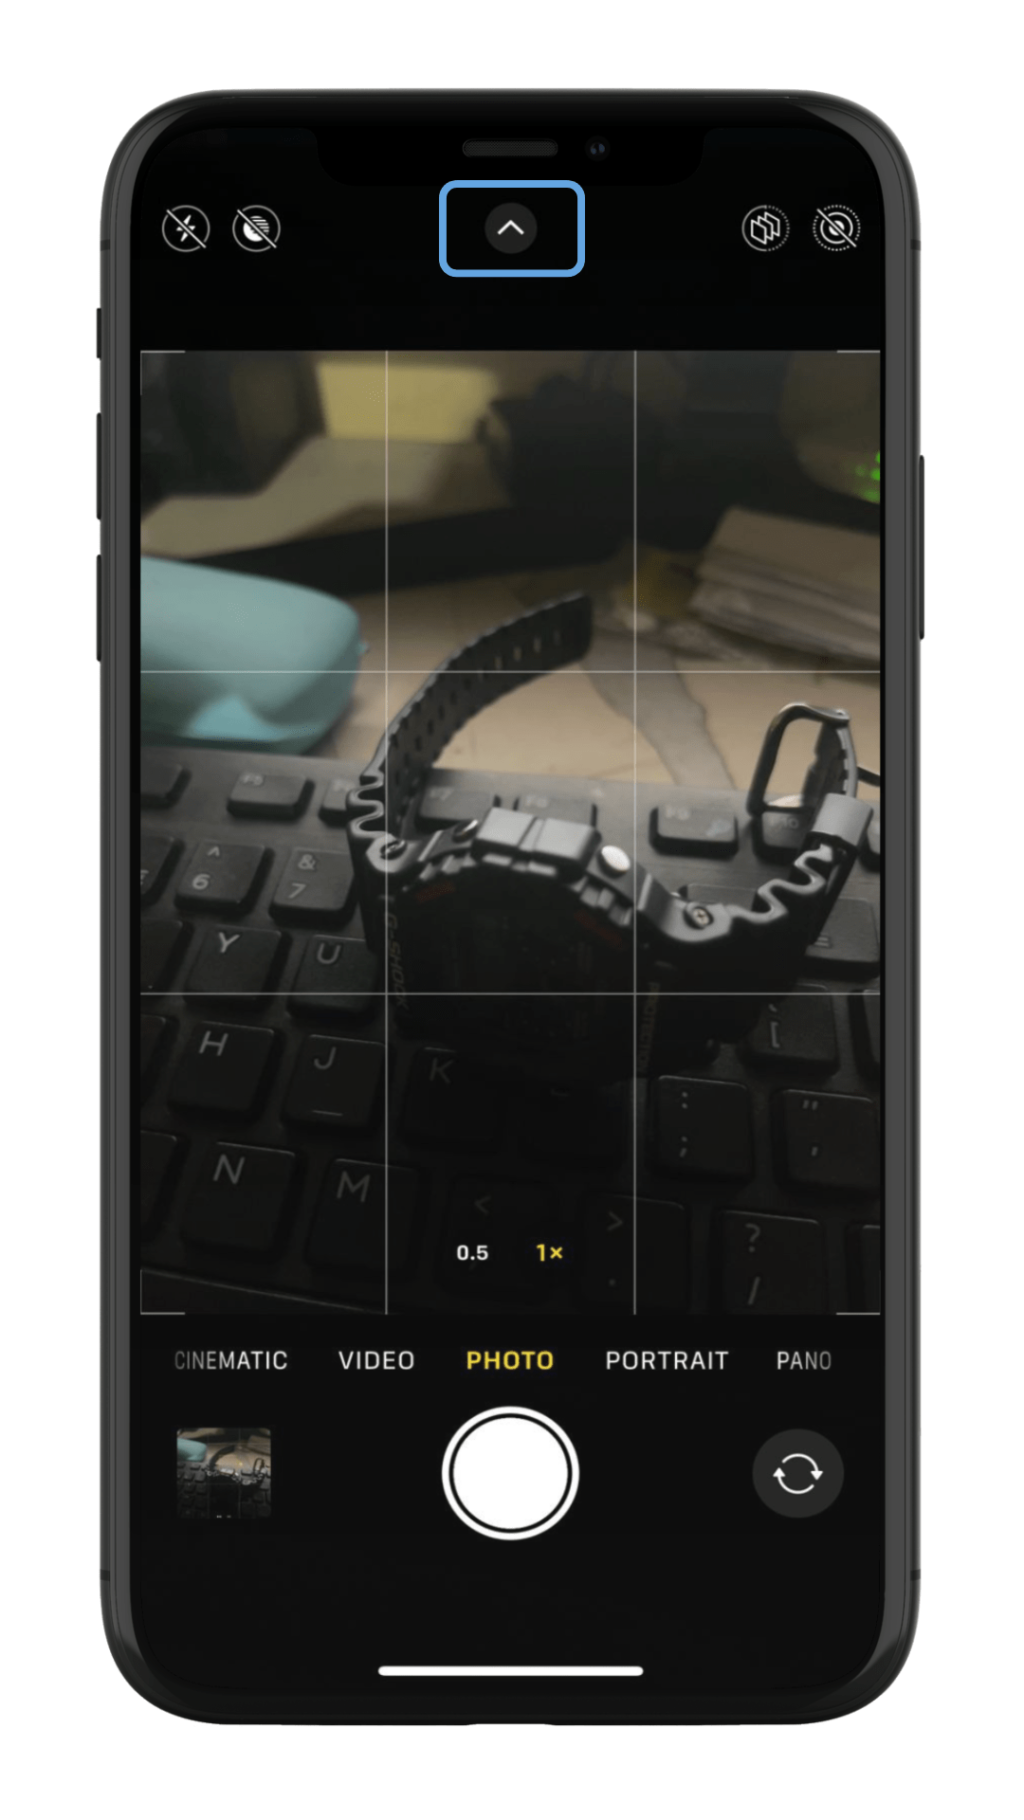
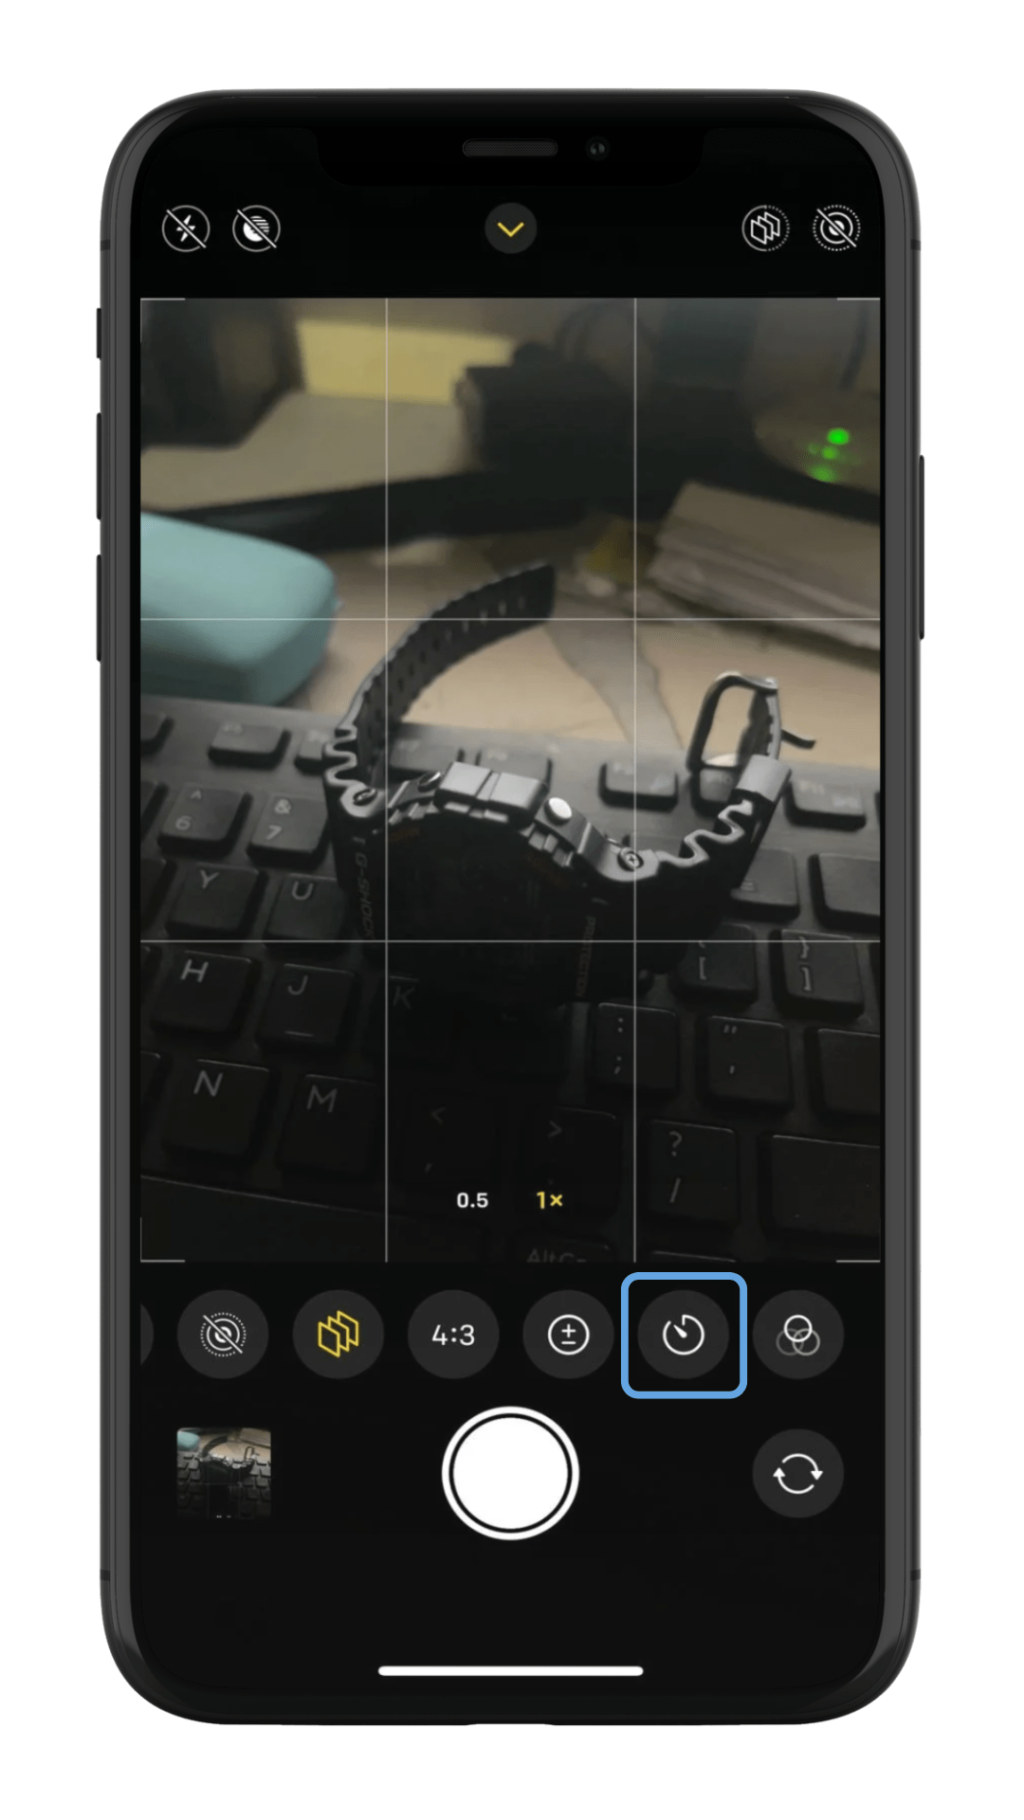
- Access Timer Settings: Tap on the arrow icon at the top of the screen to reveal additional camera settings.
- Select the Timer Icon: Swipe left to find the clock icon, which represents the timer function.
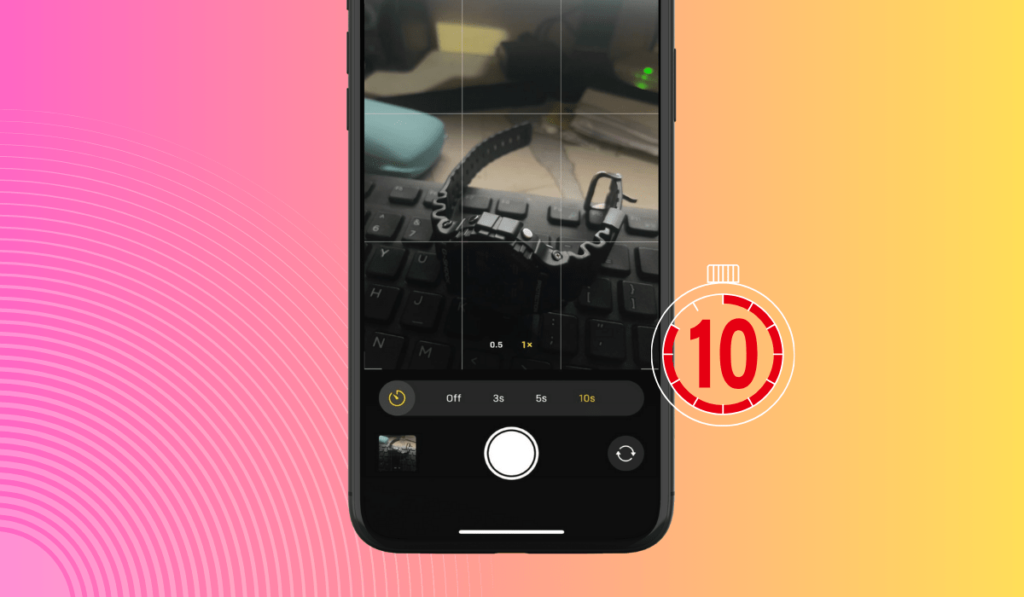
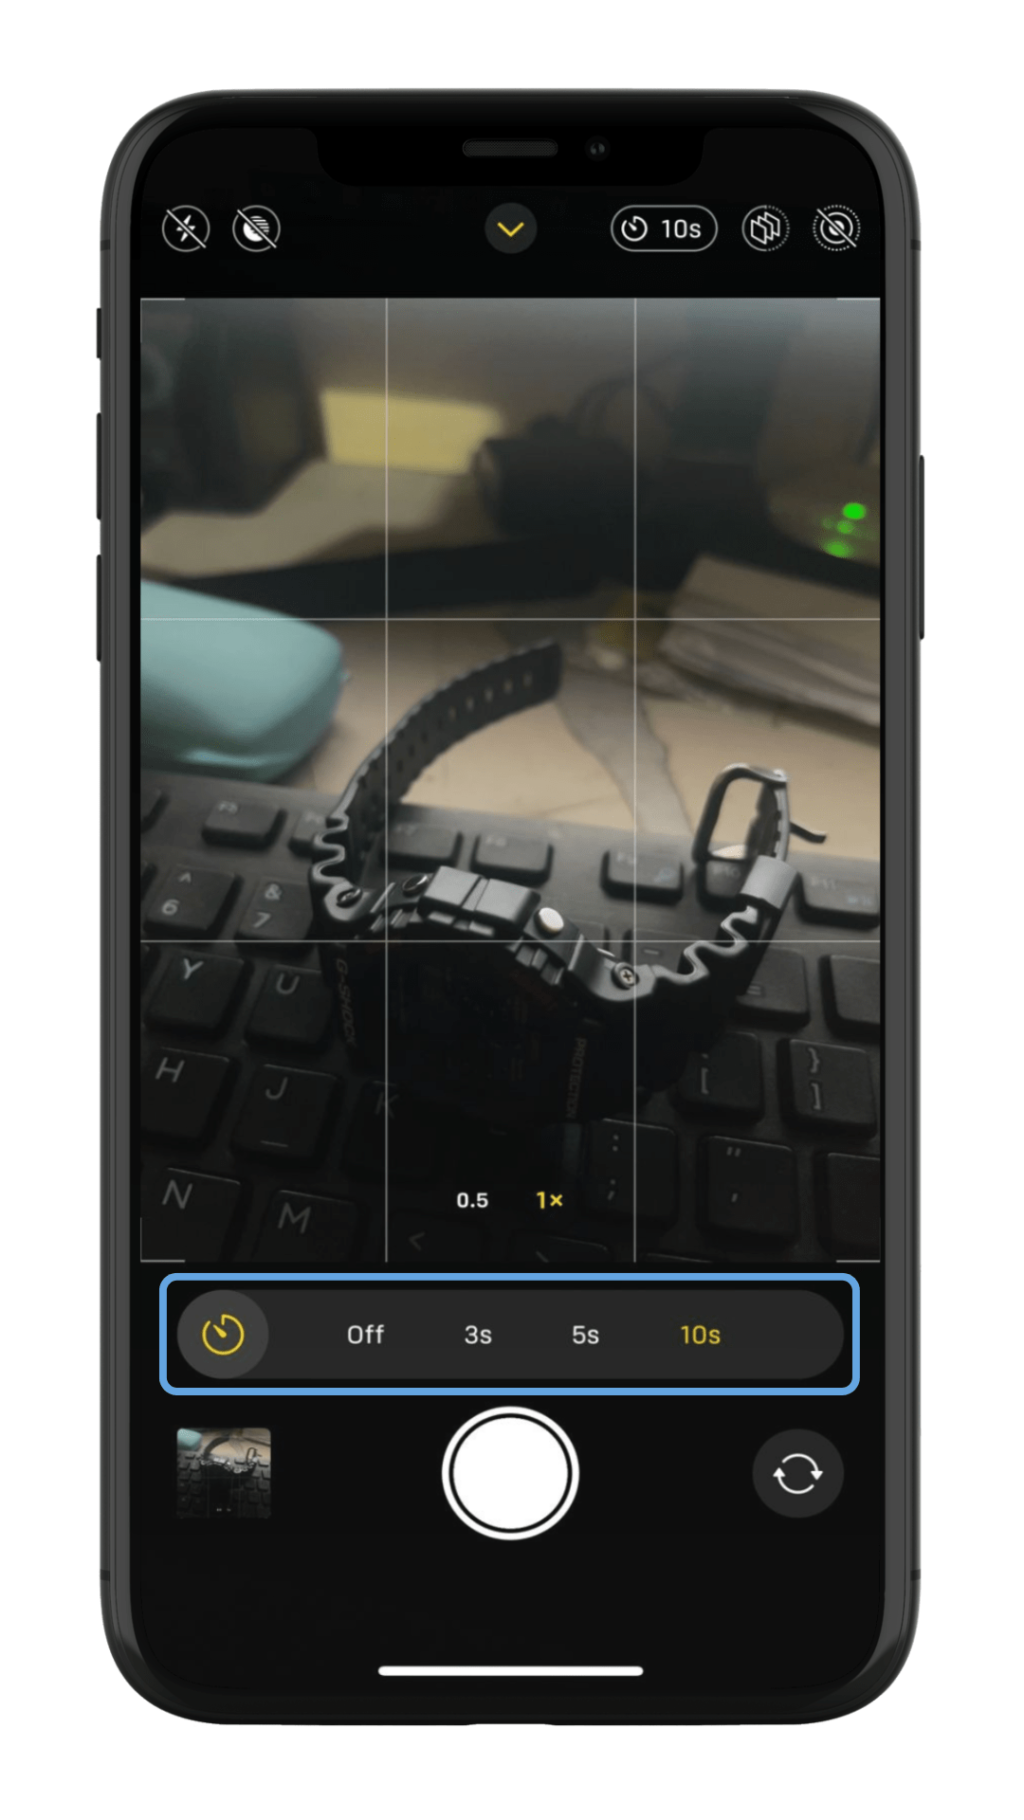
- Choose Timer Duration: Tap on the timer icon and select either a 3-second or a 10-second delay, depending on your needs.
- Activate the Timer: After setting the desired time, press the shutter button. This starts the countdown, indicated by the blinking of the iPhone’s flash.
Pre-Focusing Your Shot
To ensure your photo is sharp and well-focused, especially when you are also part of the shot:
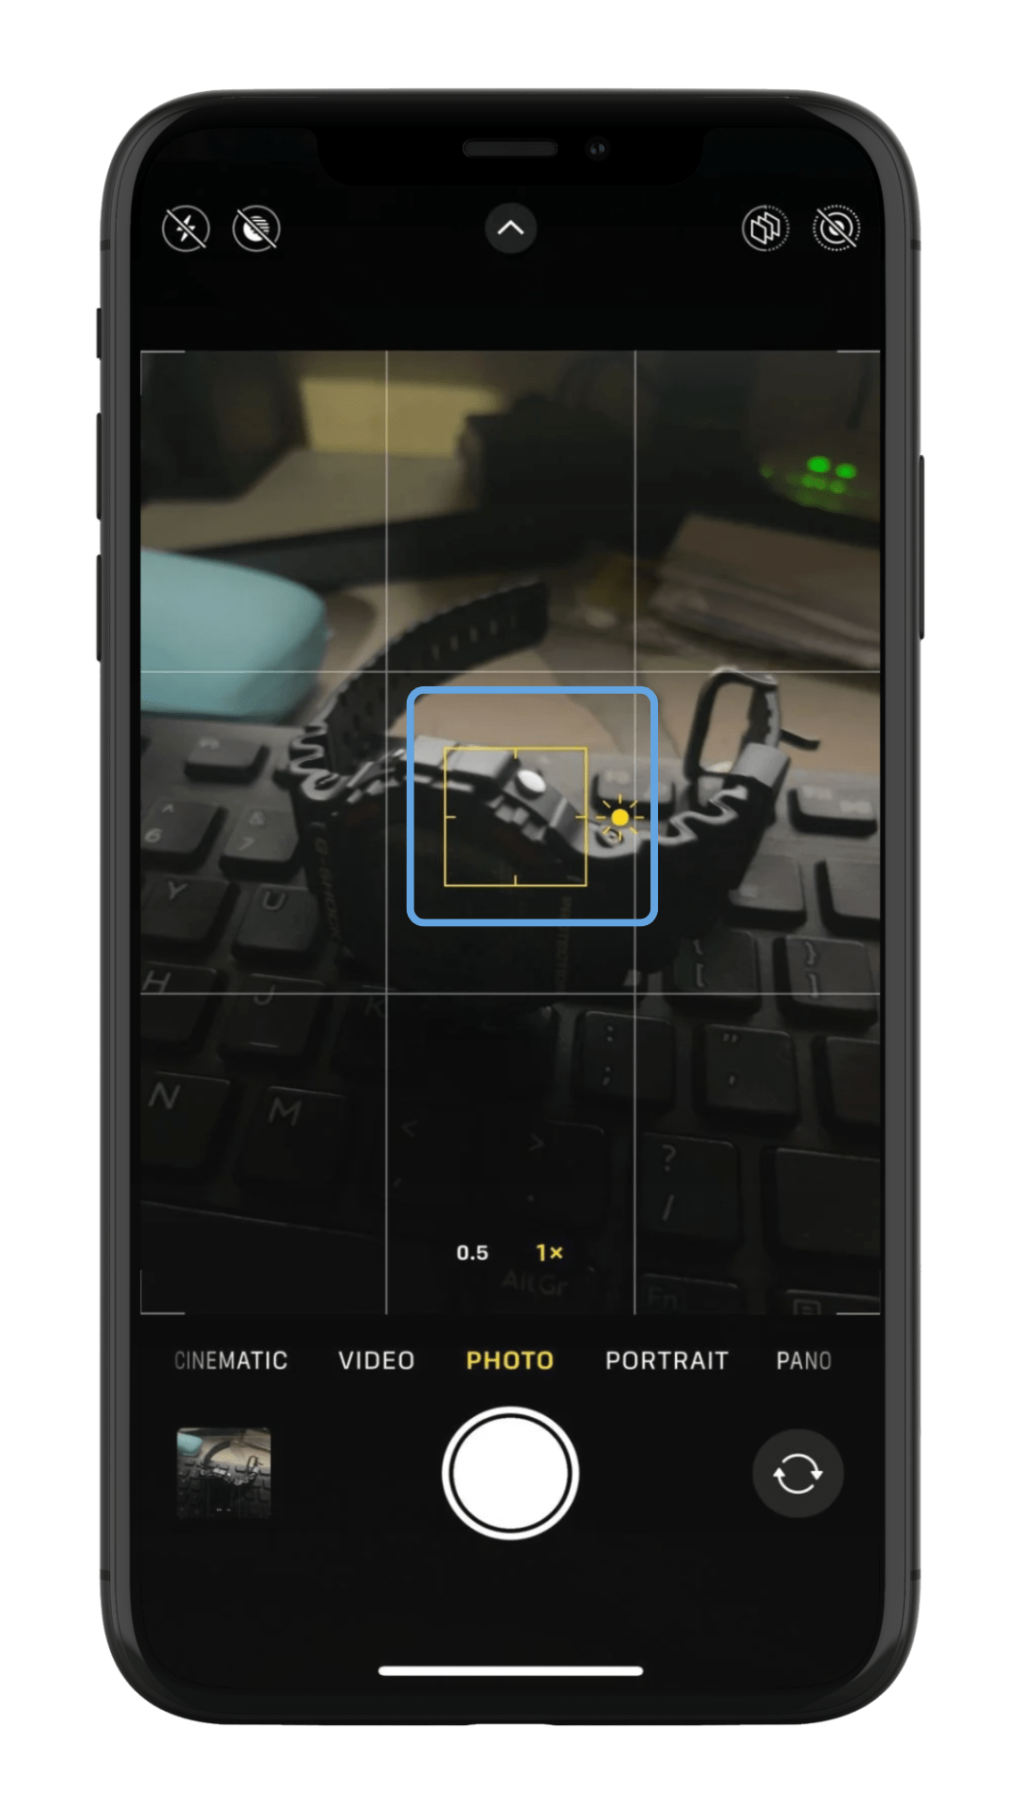
- Select a Focus Point: Before activating the timer, tap on the part of the screen you want in focus.
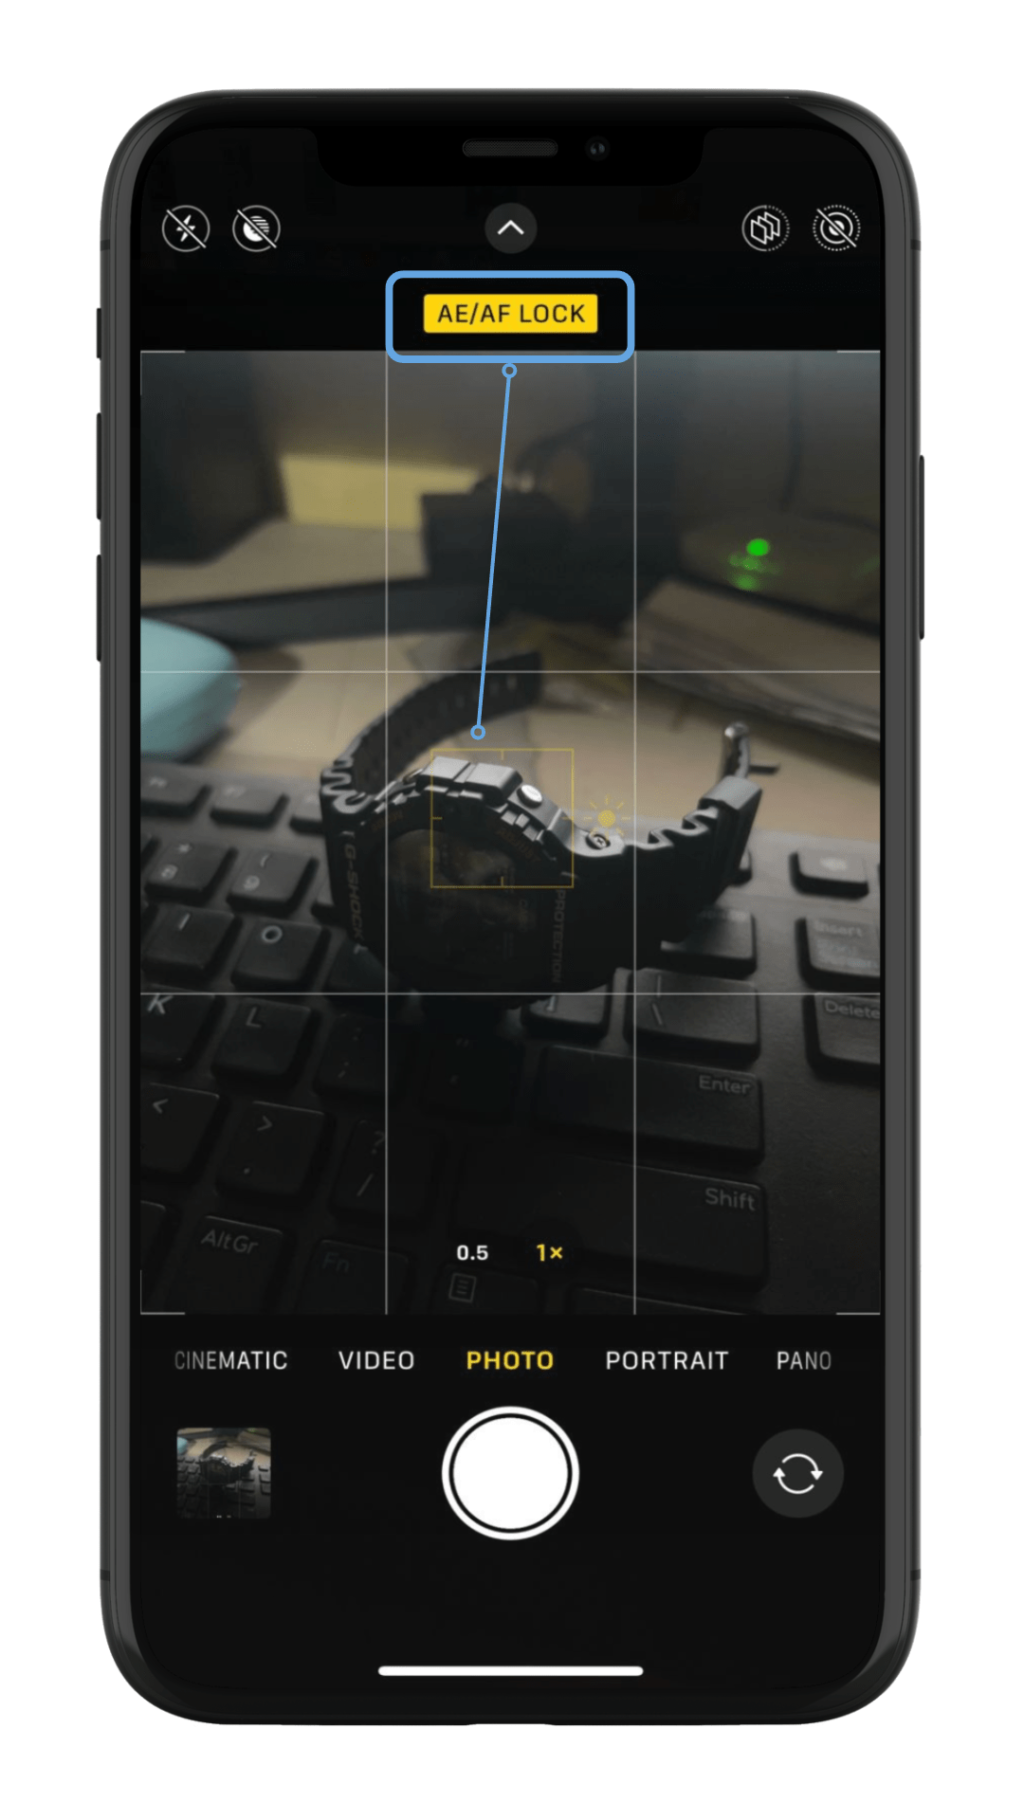
- Lock the Focus and Exposure: Hold your finger on the chosen spot until a yellow box appears, activating the AE/AF Lock. This feature locks the Auto Exposure and Auto Focus, preventing them from adjusting when the photo is taken.
- Prepare for the Shot: With the focus and exposure set, you can confidently activate the timer, knowing the camera will maintain the settings.
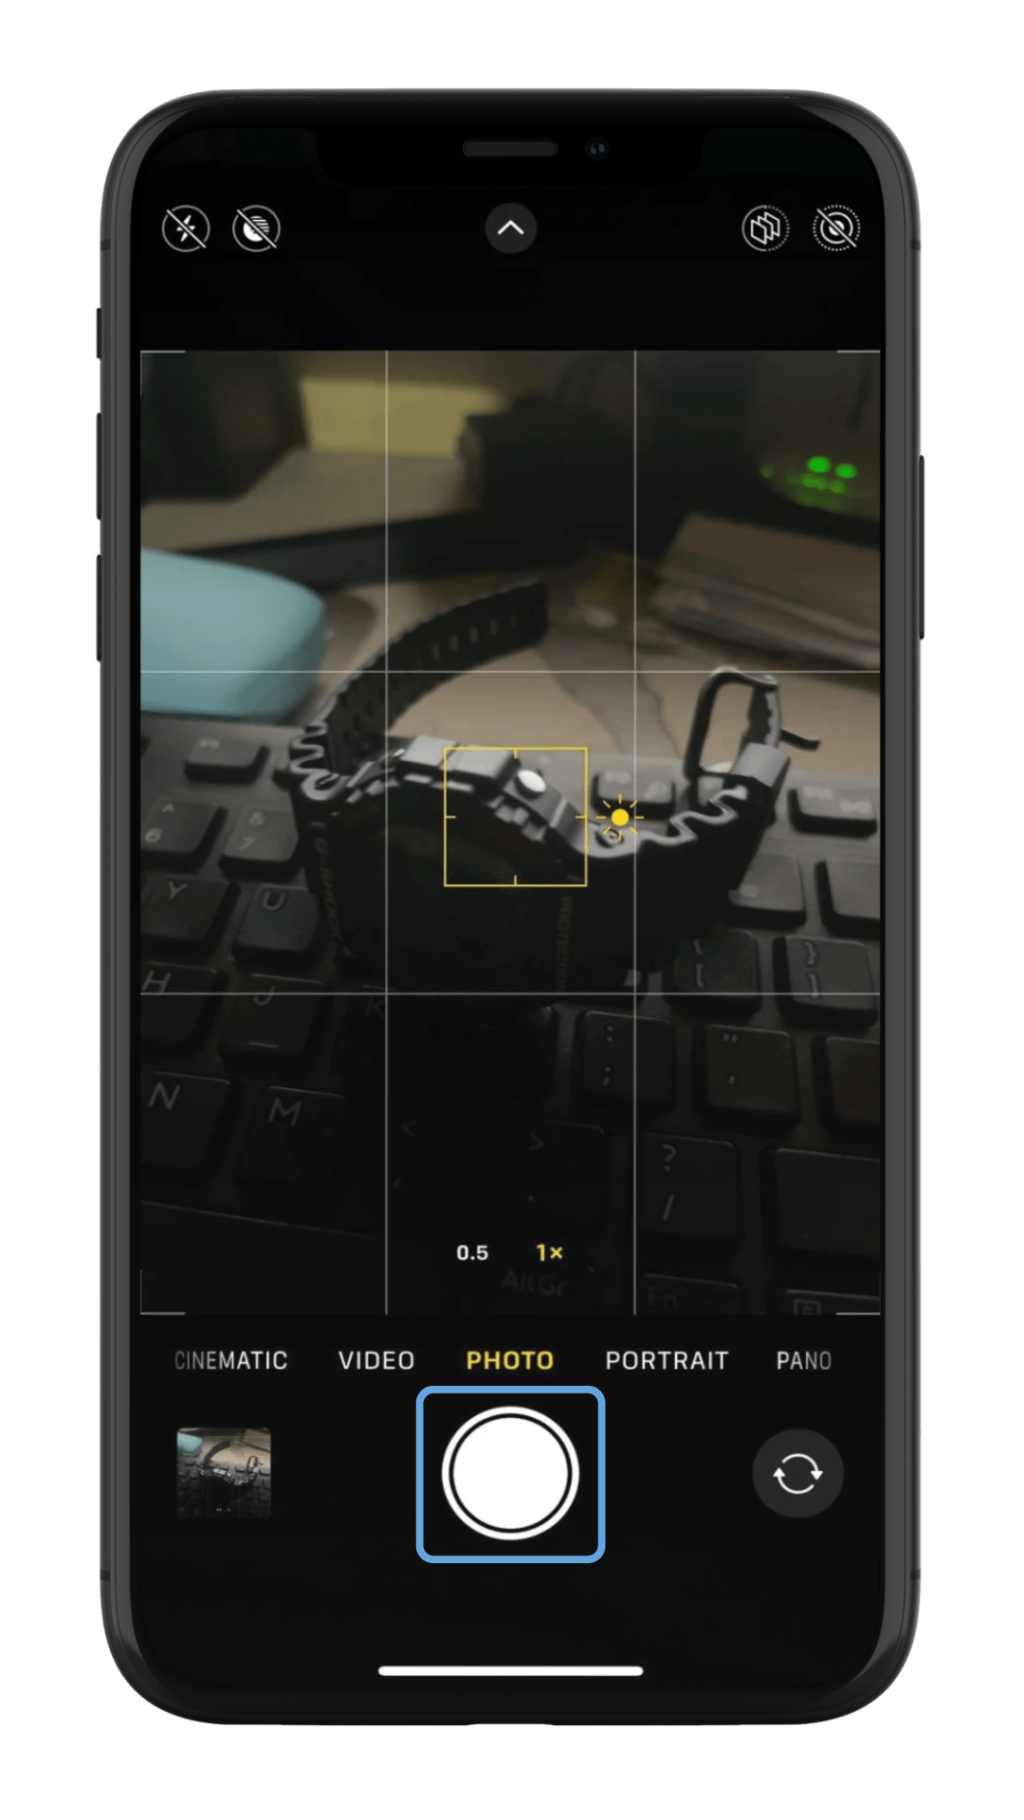
By following these steps, you can take advantage of the timer feature on your iPhone camera for both group shots and self-portraits, ensuring no one is left out of the photo and everything is perfectly in focus.
Best Uses for the iPhone Camera Timer
The timer on the iPhone camera is a versatile tool that enhances the quality and creativity of photographs in various scenarios. Here are some of the best uses for this feature:
Portraits and Selfies
Utilizing the timer function allows individuals to set up their iPhone and pose without rushing, ensuring they capture the perfect selfie or portrait. This is particularly useful when trying to capture a full-body image or when using the portrait mode to achieve a professional depth-of-field effect. The timer gives users enough time to step back and pose properly, ensuring the focus and framing are just right.
Group Photos
The timer is invaluable for group photos, ensuring that everyone, including the photographer, can be in the frame. It’s especially useful during gatherings and events where a group shot is desired without excluding anyone. By setting the timer, photographers can join the group, and everyone can prepare for the shot, reducing the chances of blinking or moving at the wrong moment. Using the timer in conjunction with burst mode can capture multiple shots, providing a selection to choose the best one where everyone looks their best.
Macro Photography and Close-Ups
For enthusiasts of macro photography, the timer on the iPhone camera can be a game changer. It allows photographers to stabilize their setup, minimizing shake and movement as they capture detailed close-ups of small subjects like insects, flowers, or intricate textures. This is particularly effective in the latest iPhone models, which feature an enhanced macro mode that allows focusing at very close distances, capturing stunning details that are not visible to the naked eye. Using the timer ensures that the phone remains still during the critical moment of capturing these close-up shots, resulting in clearer and more detailed images.
Stabilizing Your iPhone for Hands-Free Photos
To capture high-quality, hands-free photos with your iPhone, stabilizing the device is crucial. Here are effective methods to ensure your iPhone remains steady during timed captures:
Using Tripods and Mounts
- Select a Suitable Tripod: Choose a tripod that is compatible with your iPhone model. Many tripods come with adjustable grips to securely hold various phone sizes.
- Mount Your iPhone: Attach your iPhone to the tripod mount. Ensure it is snug and secure to prevent any movement.
- Adjust the Tripod: Position the tripod legs and height according to the desired angle and frame for your shot. Make sure the surface is level to avoid any tilting or unevenness in your photos.
Alternative Stabilization Techniques
- Use Stable Surfaces: If a tripod is not available, place your iPhone on a stable, flat surface such as a table or a shelf. Use small, soft objects like a bean bag or folded cloth to angle the phone as needed.
- Improvise with Everyday Items: In absence of professional gear, everyday items like books, cups or even sticky tack can be used to prop up and stabilize your iPhone for timed shots.
- Remote Shutter: Minimize the need to touch your iPhone by using headphones with volume controls or a Bluetooth remote to activate the shutter. This reduces the risk of camera shake when pressing the shutter button directly on the device.
By utilizing these stabilization methods, photographers can enhance the sharpness and overall quality of their hands-free iPhone photos, ensuring the camera remains still during the timer countdown.
Common Mistakes and How to Avoid Them
Setting the Wrong Timer Duration
One common mistake when using the timer on the iPhone camera is selecting the wrong duration. For quick shots where the scene is already set, a 3-second timer is sufficient and helps avoid camera shake from pressing the shutter. However, for group photos or scenarios where more setup time is needed, a 10-second timer is recommended. This gives everyone, including the photographer, enough time to get into position and pose comfortably.
Ensuring a Straight Frame and Good Composition
Another frequent error is neglecting the frame and composition of the shot. To capture visually appealing photos, it’s crucial to ensure the camera is level and the composition is balanced. Using the grid feature in the iPhone’s camera settings can aid in aligning the shot properly. Additionally, paying attention to the rule of thirds will help in placing key elements of the photo off-center, which enhances the overall aesthetic appeal. Always check the periphery of your frame to avoid unwanted objects in the photo, and consider the positioning of all elements to maintain a harmonious composition.
Conclusion
Throughout this article, we’ve journeyed through the steps and strategies essential for capturing hands-free photos using the iPhone’s timer feature, underscoring its significance in enhancing the quality and creativity of your photography. From setting up the timer to stabilizing your device and avoiding common pitfalls, we’ve provided a comprehensive guide to ensure that you’re equipped to capture every moment perfectly, whether it’s a group shot that includes the photographer or a detailed macro image. The emphasis on preparation, such as choosing the right timer duration and ensuring the device’s stability, serves as a reminder of the importance of detail in photography.
In this digital age, where memories are often captured in a click, maximizing the use of technology like the iPhone’s camera timer can significantly elevate your photographic endeavors. By embracing the tips and techniques discussed, photographers, from enthusiasts to professionals, can explore new creative horizons and capture stunning images with ease and precision. Furthermore, this guide encourages ongoing learning and experimentation within the field of photography, inviting readers to continue refining their skills and perhaps even inspiring further research into advanced photographic techniques and tools.
FAQs
1. How can I capture photos on my iPhone without using my hands?
To capture a photo hands-free on your iPhone, first enable Voice Control by navigating to Settings, then Accessibility, and tapping on Voice Control. After setting up Voice Control, activate Siri and say, “Hey Siri, open camera.” To take the photo, you can then say, “Turn down volume” or “Turn up volume,” which utilizes the side volume buttons to snap the photo.
2. What is the method to take a photo with an iPhone without physically touching it?
To take a photo without physically touching your iPhone, you can use the Voice Control feature. First, enable Voice Control by going to Settings, selecting Accessibility, and then Voice Control. Once activated, use Siri to open the camera by saying, “Hey Siri, open camera.” You can then command Siri to take the photo by saying, “Turn up volume” or “Turn down volume.”
3. How do I activate the self-timer on my iPhone’s camera?
To set a self-timer for photos on your iPhone, open the Camera app and look for the timer icon, which is usually represented by a clock symbol. Tap on this icon to display countdown options and choose your desired delay time for taking the photo.
4. How can I use the iPhone’s timer to take photos without triggering burst mode?
To use the timer on your iPhone camera without activating the burst mode, simply set the timer as usual by tapping the timer icon in the Camera app and selecting your preferred delay time. The camera will then take a single photo after the countdown, without entering burst mode.
