Sharing photos with family and friends has never been easier, thanks to Shared Albums on your iPhone. These albums allow you to enjoy and contribute to a collective collection of memories. But first, you’ll need to accept the invite. Whether you’re new to this feature or just need a quick refresher, we’re here to guide you through the simple steps to get started.
“Shared Albums make it easy for family and friends to enjoy photos together.”
Apple
In this article
Introduction to Shared Albums on iPhone
Shared Albums on iPhone provide an innovative way to collaborate and share photos with friends, family, or colleagues. Whether you’re capturing a memorable event, curating an album for a project, or simply wanting to share everyday moments, this feature makes it effortless. Shared Albums allow multiple people to contribute their photos, view updates in real-time, and even add comments.
This guide will walk you through the process of accepting a shared album invite on your iPhone, ensuring you can effortlessly enjoy and engage with the shared content. With clear, step-by-step instructions, you’ll be able to navigate this process swiftly and efficiently, making photo sharing a seamless experience.
Why Use Shared Albums on iPhone?
Shared Albums on iPhone offer a convenient way to share photos and videos with friends and family. Whether you’re documenting a wedding, a vacation, or everyday moments, Shared Albums allow you to collect and share these memories in one place. With iPhone’s seamless integration, you can invite others to view, comment on, and even contribute their own photos and videos to the album.
Another great advantage is privacy. Unlike sharing on social media, Shared Albums are only accessible by the people you invite. They don’t get posted publicly, which means you have complete control over who sees your content. This makes it an ideal choice for sharing special moments with a selected group of individuals.
Moreover, Shared Albums save storage space on your device. Since the photos and videos are stored in iCloud, they don’t occupy additional space on your iPhone. This is particularly useful if you have a large number of photos or limited storage capacity.
Finally, you can access these albums from any Apple device signed in with your iCloud account. This allows you to enjoy and share memories whether you’re on your iPhone, iPad, or Mac.
Preparing Your iPhone for Shared Albums
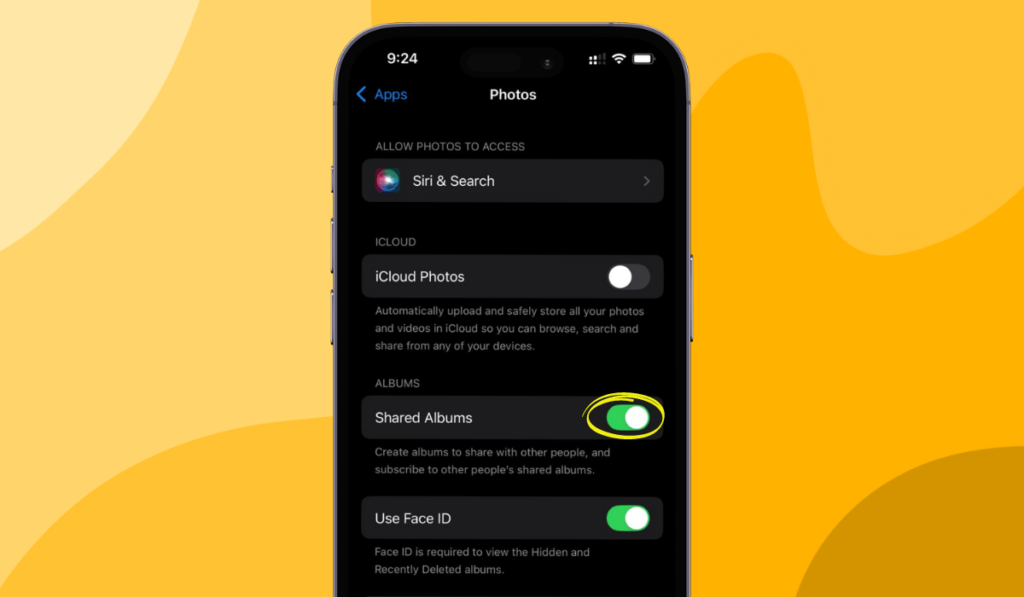
Before you can accept a shared album invite on your iPhone, you need to ensure that your device is properly set up for Shared Albums. Follow these steps to prepare your iPhone: First, ensure that Shared Albums are enabled on your iPhone.
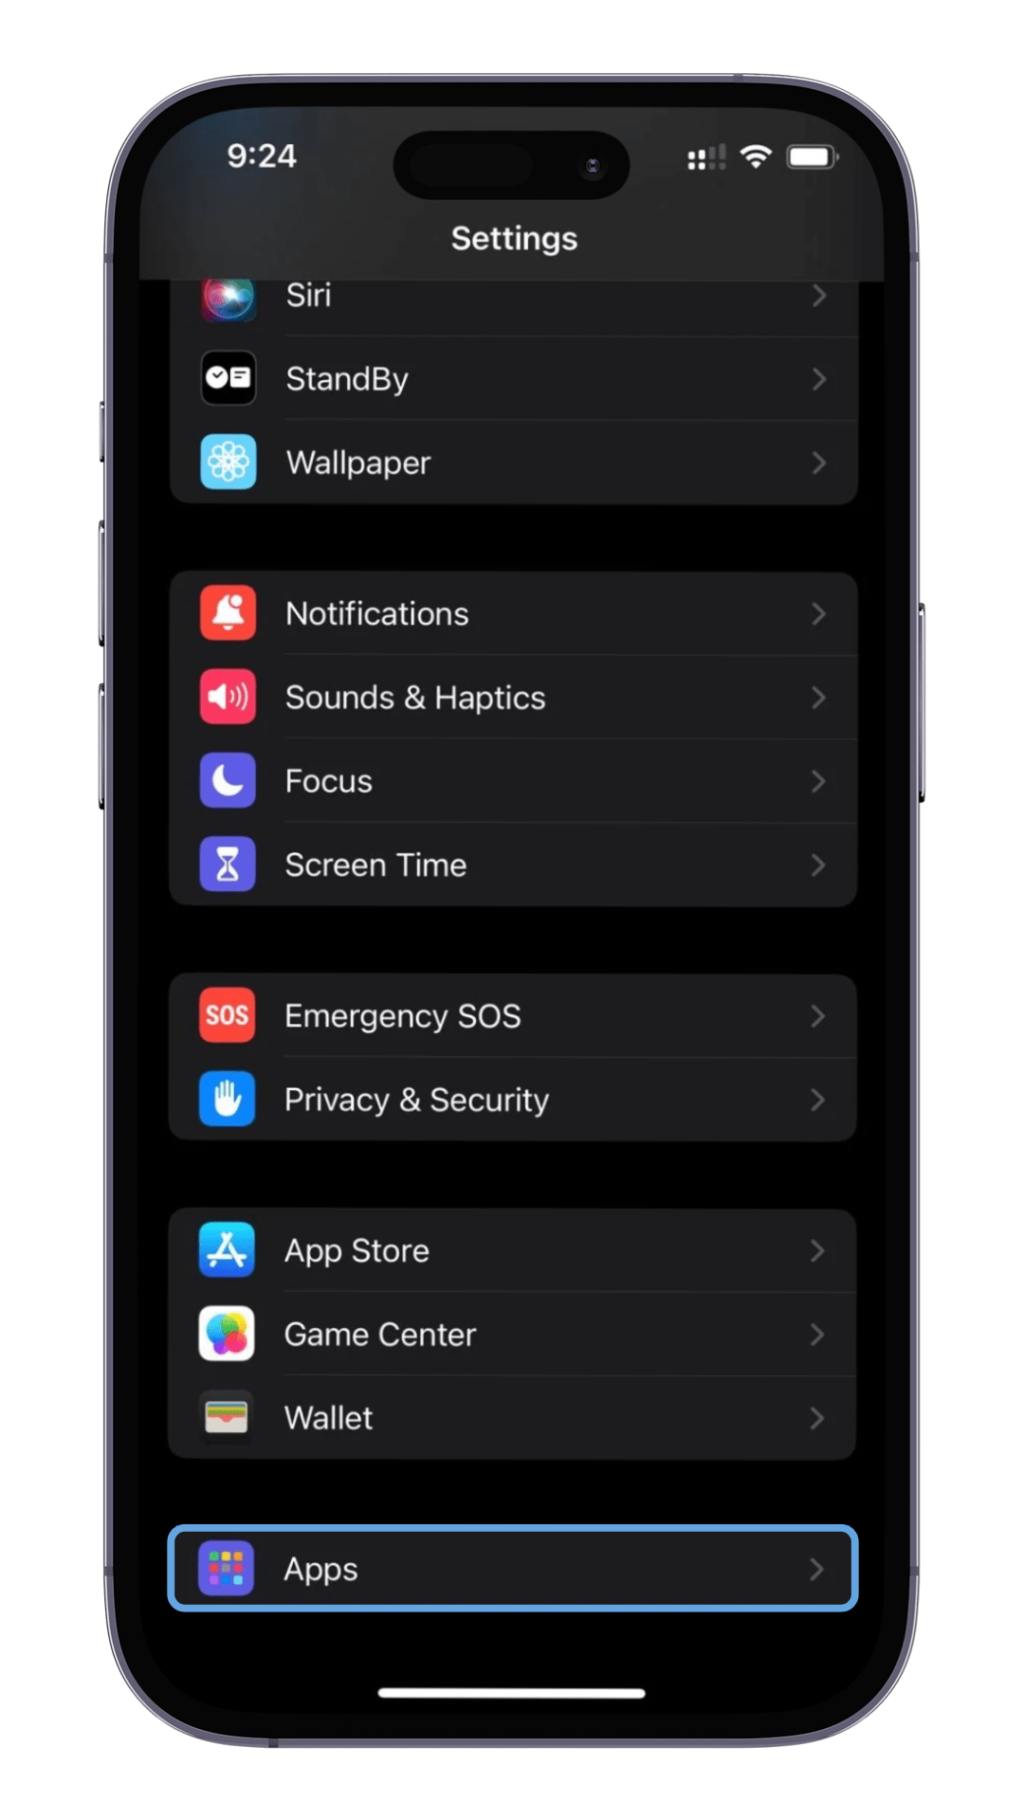
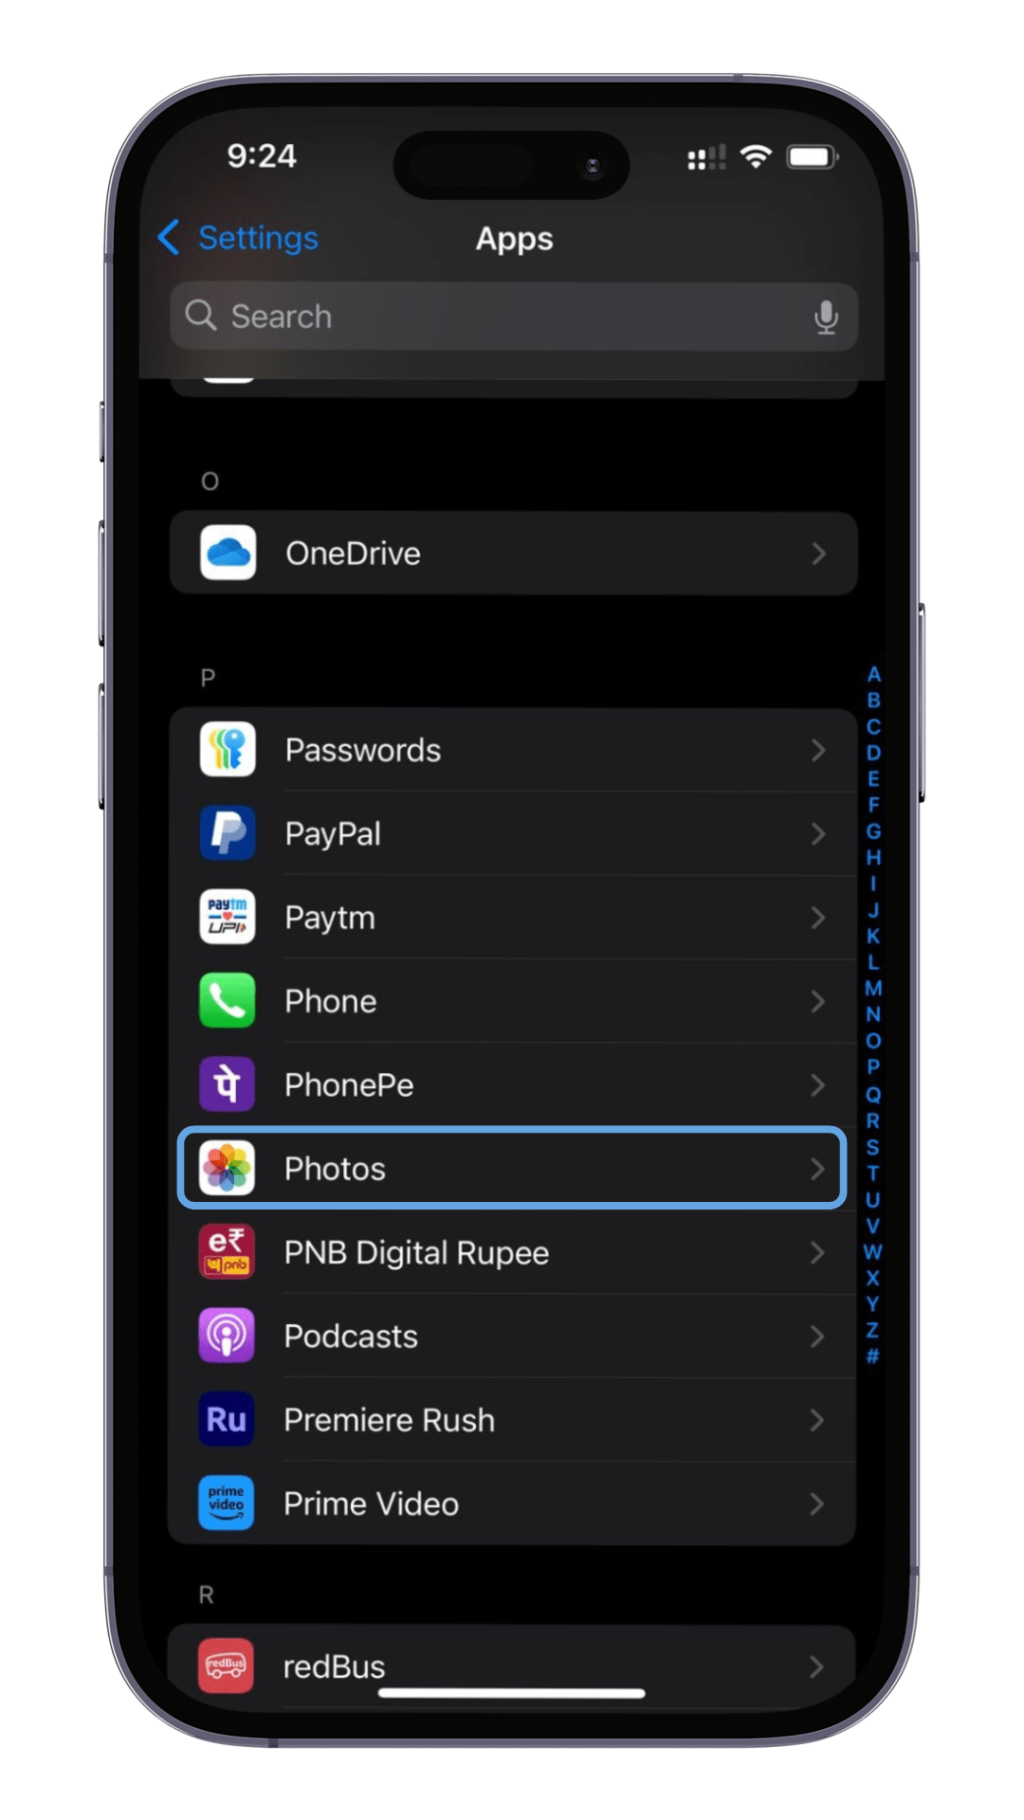
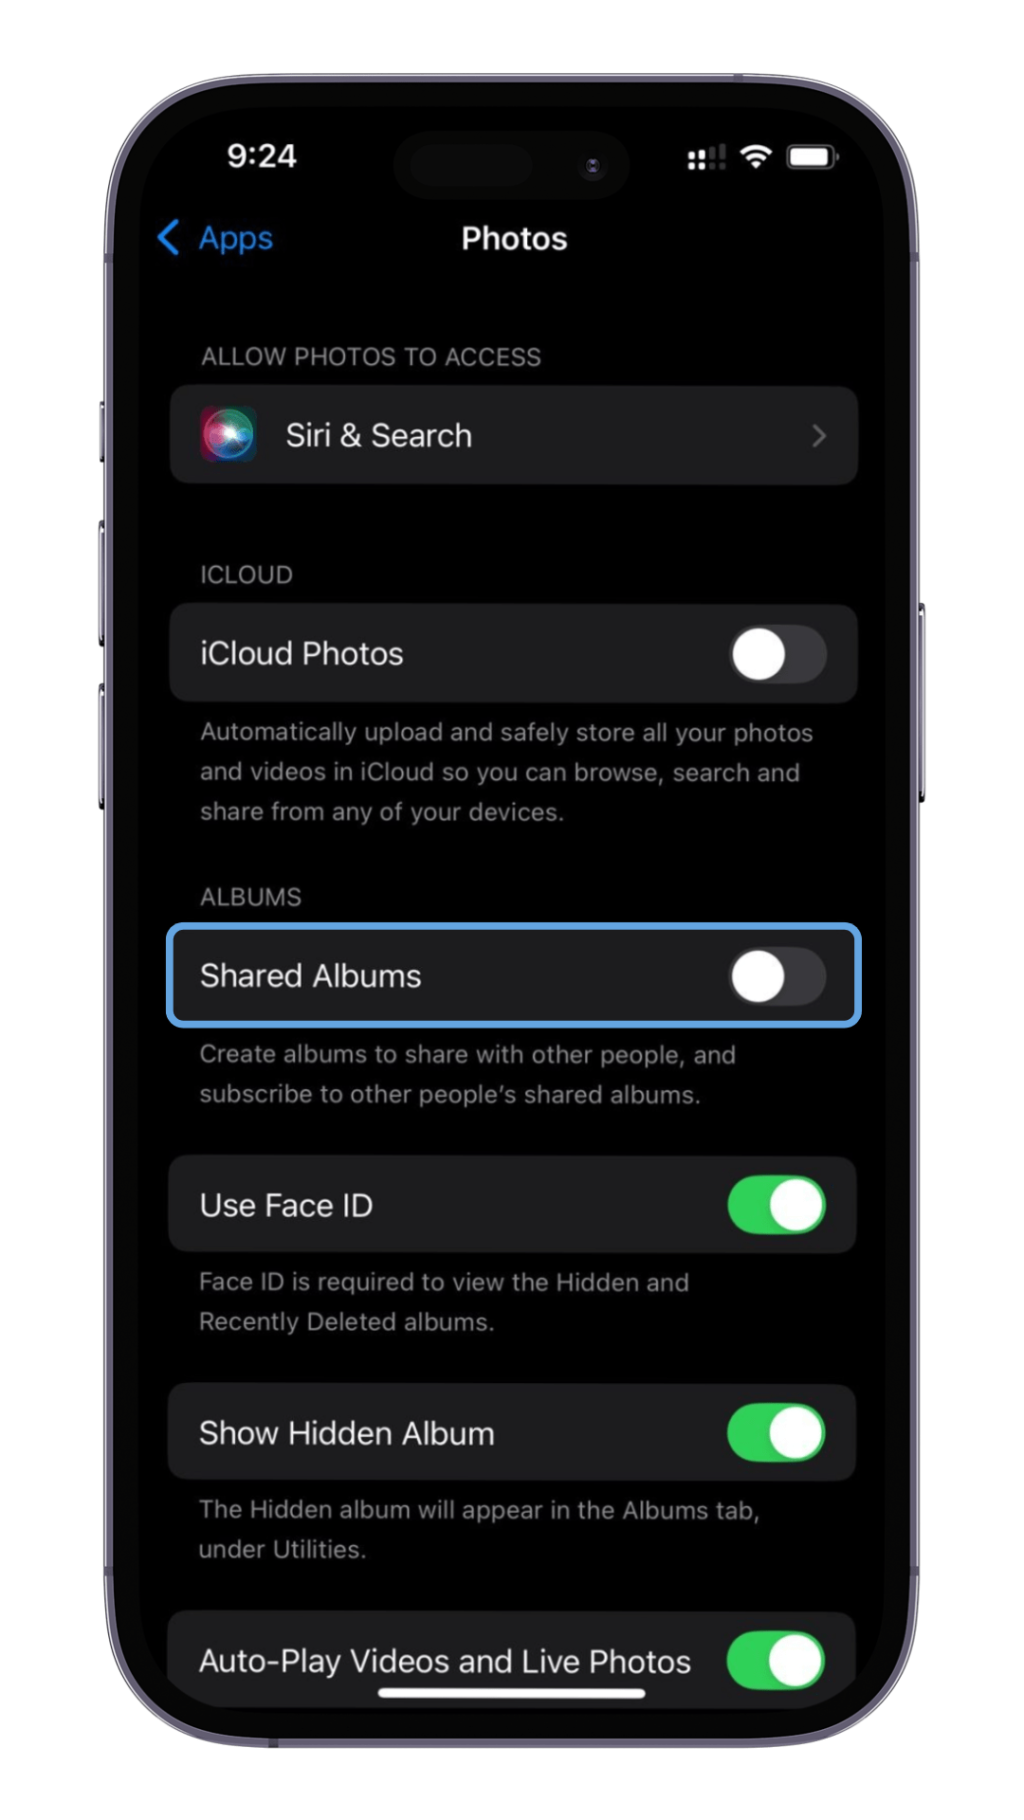
1. Open the Settings app on your iPhone.
2. Scroll down and tap on Photos.
3. Look for the Shared Albums option and toggle it on if it isn’t already enabled. This will allow you to create and receive shared albums.
Additionally, verify that iCloud Photo Library is active:
1. Go back to the Settings app and tap on your name at the top to access your Apple ID settings.
2. Select iCloud and then tap on Photos.
3. Ensure that iCloud Photos is turned on. This ensures that your photos and shared albums are stored and synced via iCloud.
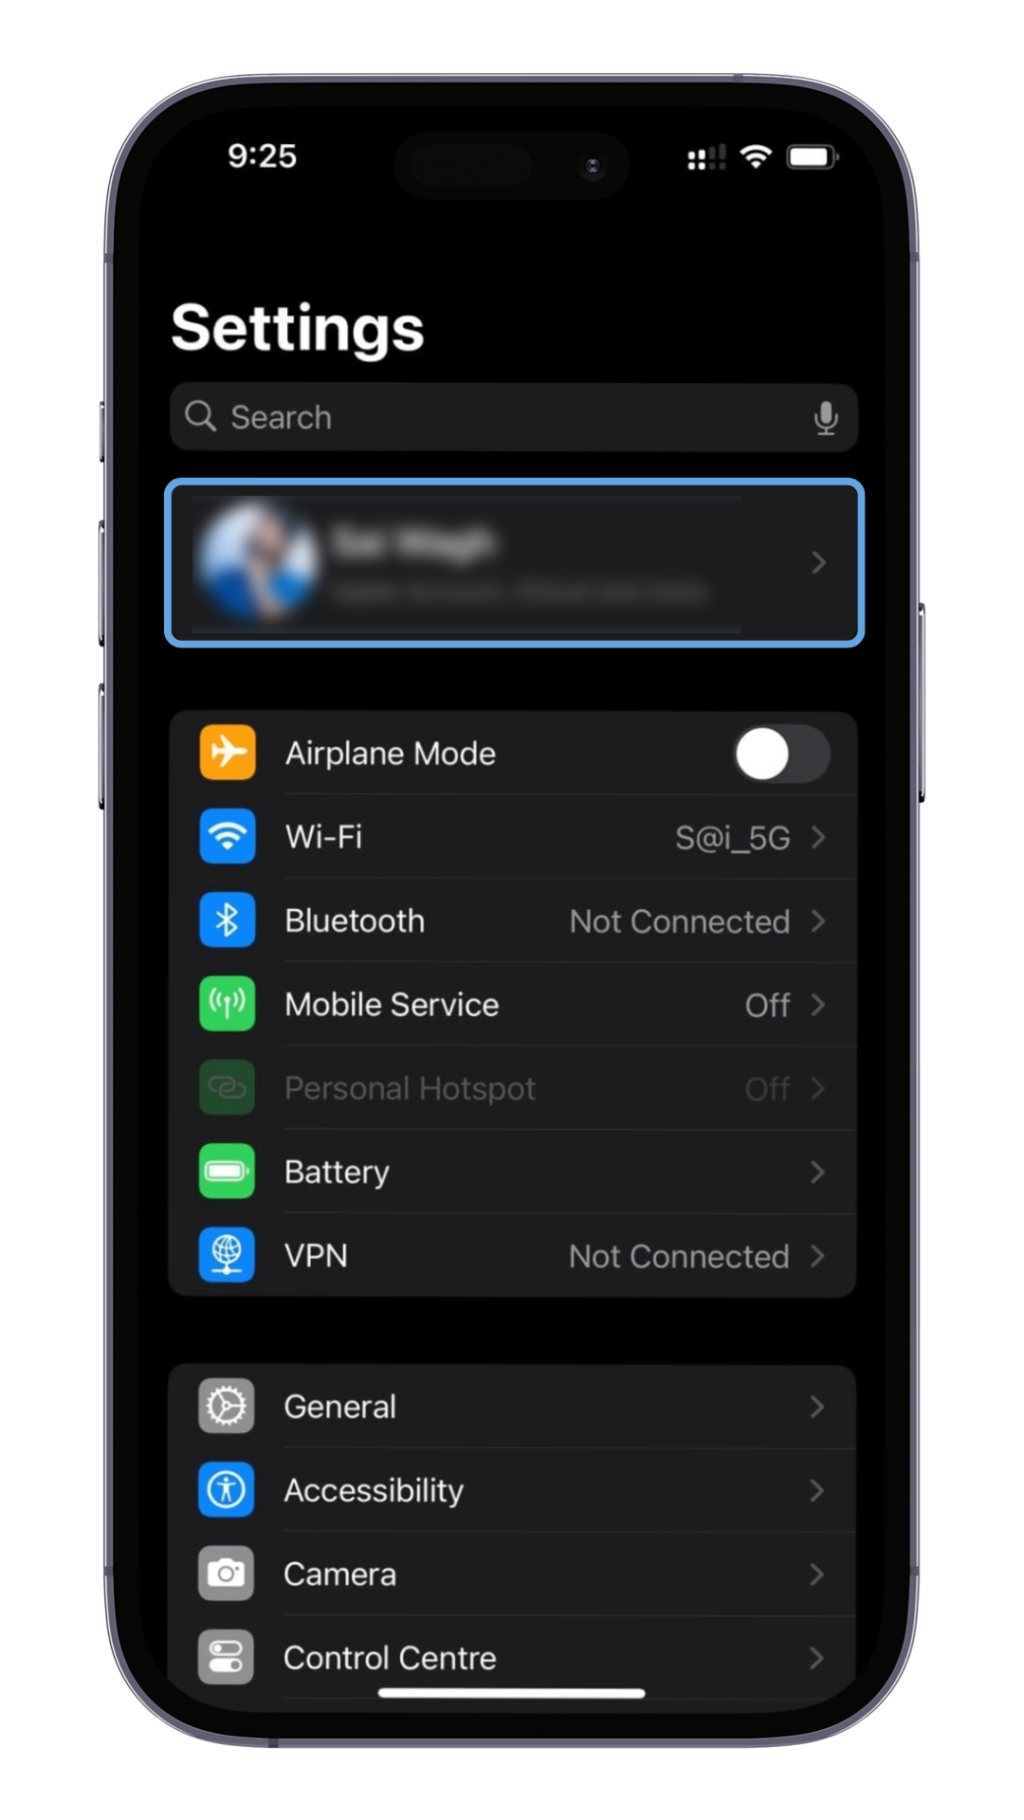
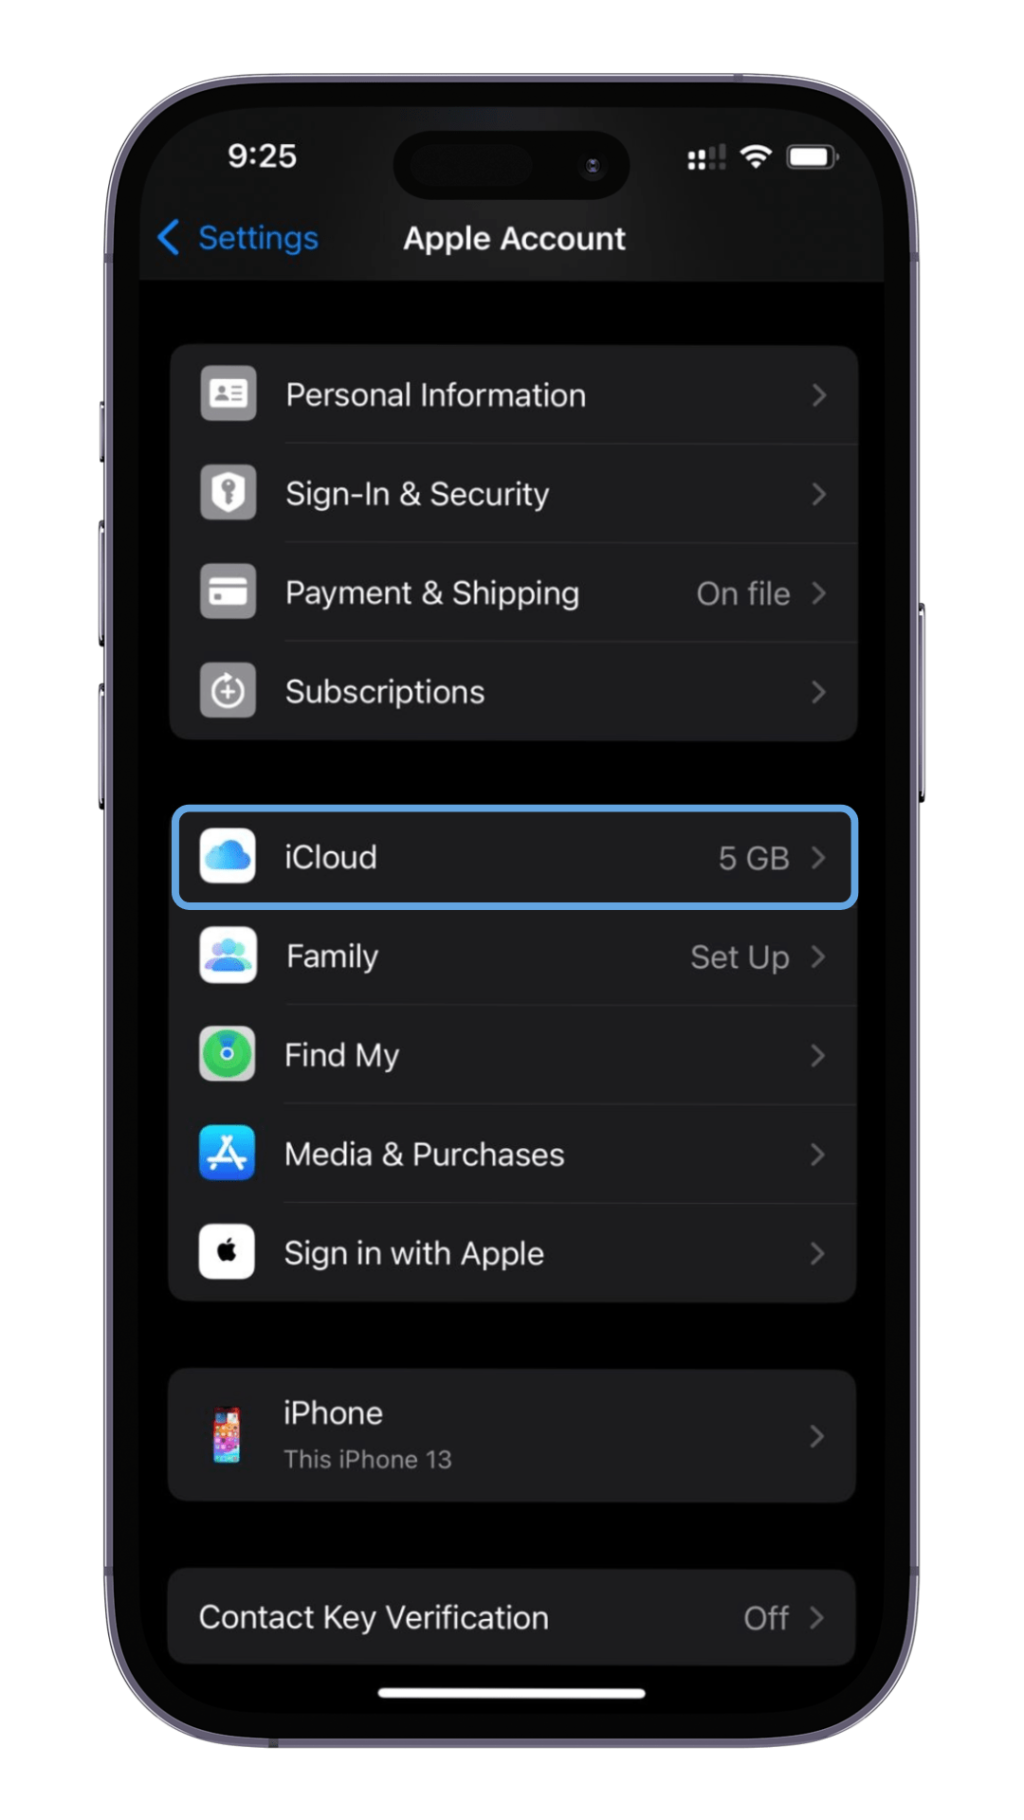
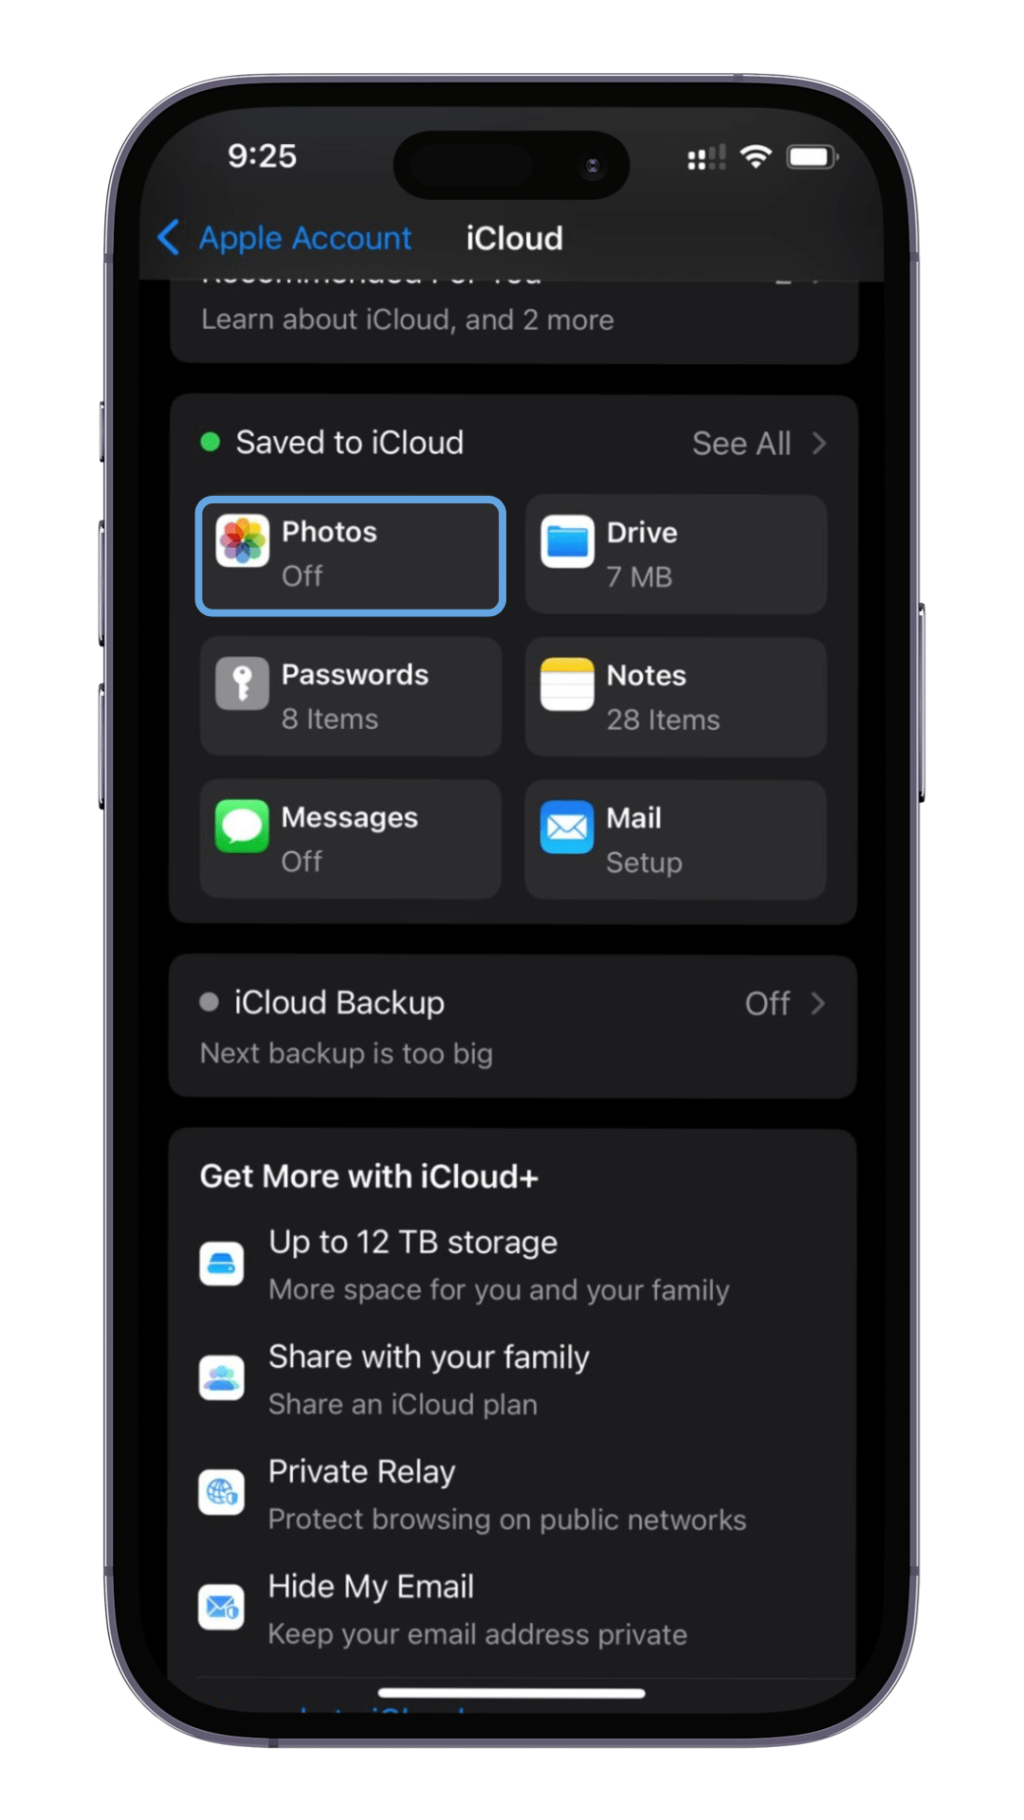
After enabling these settings, your iPhone is ready to accept shared album invites. Proceed to the next section to learn how to receive and accept an invitation.
How to Receive a Shared Album Invite
To receive a shared album invite on your iPhone, follow these simple steps:
1. Check your notifications: Ensure that notifications for Photos are enabled. Go to Settings > Notifications > Photos and toggle on Allow Notifications.
2. Enable Shared Albums: Verify that the Shared Albums feature is turned on. Navigate to Settings > [Your Name] > iCloud > Photos and switch on Shared Albums.
3. Update iOS: Ensure your device is running iOS 8 or higher. This compatibility is crucial for receiving shared album invites. Update your iOS by going to Settings > General > Software Update and following the on-screen instructions if an update is available.
4. Check for invites: Open the Photos app and go to the For You section. Look for any notifications regarding shared album invites. Tap on the invite and then tap Accept to join the album.
By following these steps, you can successfully receive and accept shared album invites on your iPhone. If you encounter any issues, refer to our troubleshooting section for additional guidance.
Steps to Accept a Shared Album Invite
Once you’ve received a shared album invite, follow these steps to accept it:
1. Open the Photos App: Launch the Photos app from your iPhone’s home screen.
2. Navigate to the ‘For You’ Tab: Tap the For You tab located at the bottom of the screen. Here, you will see a notification for the shared album invite.
3. Tap on the Invitation: Find the notification for the shared album invite and tap on it to open the invite details.
4. Accept the Invite: In the invite details, tap Accept to join the shared album. Once accepted, the shared album will appear in your album list under the Albums tab.
Following these steps will ensure that you successfully accept the shared album invite and start accessing the shared photos and videos right away.
Troubleshooting Common Issues with Shared Album Invites
If you encounter issues receiving shared album invites, there are several troubleshooting steps you can take to resolve the problem.
1. Check Your Settings: Ensure that Shared Albums are enabled on your iPhone. To do this, go to Settings > Photos and make sure the “Shared Albums” option is turned on.
2. Verify Your Apple ID: Confirm that the invite was sent to the correct Apple ID. You can verify your Apple ID by going to Settings > [Your Name].
3. Ensure Sufficient Storage: If your iCloud storage is full, you might not be able to receive new shared album invitations. Check your storage by going to Settings > [Your Name] > iCloud > Manage Storage.
4. Update iOS: Make sure your device is running the latest version of iOS. You can check for updates by going to Settings > General > Software Update.
5. Notification Settings: Verify that notifications for Photos are enabled. Go to Settings > Notifications > Photos and ensure that notifications are allowed.
6. Expired Invites: If you’re getting a “Fail to Retrieve” message, the invitation link might have expired. Ask the sender to resend the invite.
If you have followed these steps and are still experiencing issues, consider restarting your device or contacting Apple Support for further assistance.
How to Share Your Own Album with Others
To share an album with others, you first need to enable the Shared Albums feature on your iPhone.
- Open the Settings app.
- Tap on Your Name at the top.
- Go to iCloud.
- Ensure Photos is selected, then switch on Shared Albums.
Now, follow these steps to create and share your own album:
- Open the Photos app.
- Tap the Albums tab at the bottom of the screen.
- Tap the + symbol in the top-left corner.
- Select New Shared Album.
- Enter a name for your album and tap Next.
- Select the contacts you want to share this album with, either from your contacts list or by entering their email addresses.
- Tap Create. Your new shared album is now ready, and the invited contacts will receive an invitation to view and contribute to it.
Sharing photos and moments with loved ones has never been easier. With these simple steps, you can bring others into your cherished memories.
Securing Your Shared Albums
Securing your shared albums ensures that your precious memories stay protected and only accessible to the intended audience. Here’s how you can secure your shared albums on your iPhone:
Enable Shared Album Privacy Features
To start, navigate to Settings > your name > iCloud > Photos. Make sure the Shared Albums feature is enabled. Then, follow these additional steps:
- Review Participants: Open the shared album in the Photos app, tap on the People icon, and review the list of participants. Remove anyone you do not want to have access.
- Public Website Option: In the shared album settings, disable the Public Website option if you do not want the album to be accessible via a public URL.
- Control Comments and Likes: Decide whether to allow subscribers to comment and like photos by toggling the relevant options in the shared album settings.
Regularly Update Your Privacy Settings
To maintain the security of your shared albums, regularly update your privacy settings:
- Check Permissions: Periodically review who has access to your shared albums and adjust permissions as needed.
- Disable Invites from Unknown Sources: Go to Settings > Photos and ensure that only people you trust can invite you to shared albums.
- Secure Your iCloud Account: Use strong, unique passwords and enable two-factor authentication for your iCloud account to protect all data, including shared albums.
Customizing Notifications for Shared Albums
Managing notifications for your shared albums on iPhone ensures you stay updated without being overwhelmed by alerts. Here’s how to customize these notifications:
1. Open the Settings app on your iPhone.
2. Scroll down and select Photos.
3. Tap on Notifications.
4. Here, you can toggle notifications on or off. You can also customize how you receive alerts by choosing banner style, sounds, and badge settings.
To ensure you receive notifications for specific shared albums without disturbances:
1. Open the Photos app.
2. Navigate to the For You section.
3. Tap on the shared album for which you want to customize notifications.
4. Tap the more options icon (usually three dots or lines) and select Notifications settings.
5. Here, you can choose to receive notifications for likes, comments, new photos, and more, ensuring you’re only alerted for updates that matter to you.
By fine-tuning these settings, you can manage your shared albums efficiently while keeping unnecessary distractions to a minimum.
Tips for Organizing Photos in Shared Albums
Organizing photos in shared albums can streamline your photo-sharing experience and make it easy for everyone involved to find the images they’re looking for. Follow these tips to keep your shared albums neat and intuitive.
1. Create Thematic Albums: Instead of dumping all photos into one album, create separate albums based on events, dates, or themes such as “Vacation 2023” or “Birthday Parties.” This makes it easier to browse and locate specific photos.
2. Use Descriptive Titles: Give your shared albums descriptive and relevant titles. This helps everyone quickly identify what the album contains without needing to open it.
3. Add Captions and Comments: Adding captions to your photos can provide context and make the album more engaging. Encourage other contributors to add comments on the photos, making the collection more interactive.
4. Regularly Update the Albums: Keep the album current by regularly adding new photos and removing duplicates or irrelevant images. This ensures that the album remains organized and relevant.
5. Use Favorites for Quick Access: Mark your favorite photos within a shared album to access them quickly. This can be particularly useful for milestones or important events you want to revisit regularly.
6. Arrange in Chronological Order: For event-based albums, arranging photos in chronological order can help tell the story of the event more coherently. This can usually be done by sorting photos based on the date they were taken.
By implementing these tips, you can enhance the user experience of your shared albums, making photo-sharing a joy for everyone involved.
FAQs
How can I create a shared album on my iPhone?
First, enable shared albums in your device’s settings. Go to Settings > Photos and switch on Shared Albums. Then, open the Photos app, tap the Albums tab, select the + icon, name your album, select the contacts you want to share it with, and tap Create.
How can I save photos from the shared album on my iPhone?
Open the shared album, select the photos you want to save, tap the Share button, and then choose Save Image.
How can I delete a shared album on my iOS device?
To delete a shared album, open the album, tap the person icon, and select Delete Shared Album. This will remove the album from all devices and permanently delete all photos.
