Imagine that you opened an informative website to surf details and a pop-up appeared on your screen, asking you to sign up for its newsletter. Because the technology is at its peak, and it’s way too easy to click a button and sign-up anything you want (or maybe you don’t) – you go ahead to sign up. But do you really know how to cancel subscriptions on iPhone?
In this article
The minute you sign for a random subscription finding it worthy, the next moment you see the “mailbox-chatters” begin with the daily, weekly, or fortnightly notifications subsequently.
As an Apple user, where every feature feels tricky- appealing features like auto-renew and free trials often catches your attention. While signing up for these subscriptions seems fascinating, it is essential to know how to cancel subscriptions on iphone.
With the speed that you signed up for that one free trial of a random makeup tutorial, a diy hack series or a first-month free OTT service, the same speed reduces when you fail to cancel subscriptions on iphone.
What Kind Of Subscriptions Can Be Cancelled On Your iPhone, iPad and Mac?
As an Apple user, you may or may not be aware of how to cancel your subscriptions when you no longer need it. Before your mailbox goes full and the “storage-crisis” arises, let us understand how to cancel subscriptions on Iphone, IPad and Mac. But before that, know what kind of subscriptions can be canceled on your device.
Always remember, only the subscriptions that you have chosen via the app store or signed up via your Apple ID can be canceled. This does not restrict you to Apple Music or iCloud subscription only. It could be anything, right from a newsletter membership to any streaming platform service. All that is important is that the sign up should have been done by your Apple ID only.
However, in the scenario where you want to cancel subscriptions on iPhone or other Apple device but didn’t sign up for it using an Apple ID, it can be a task. You will then be supposed to cancel those directly via the company’s website, or by connecting via customer service.
How To Cancel Subscriptions On iPhone and iPad
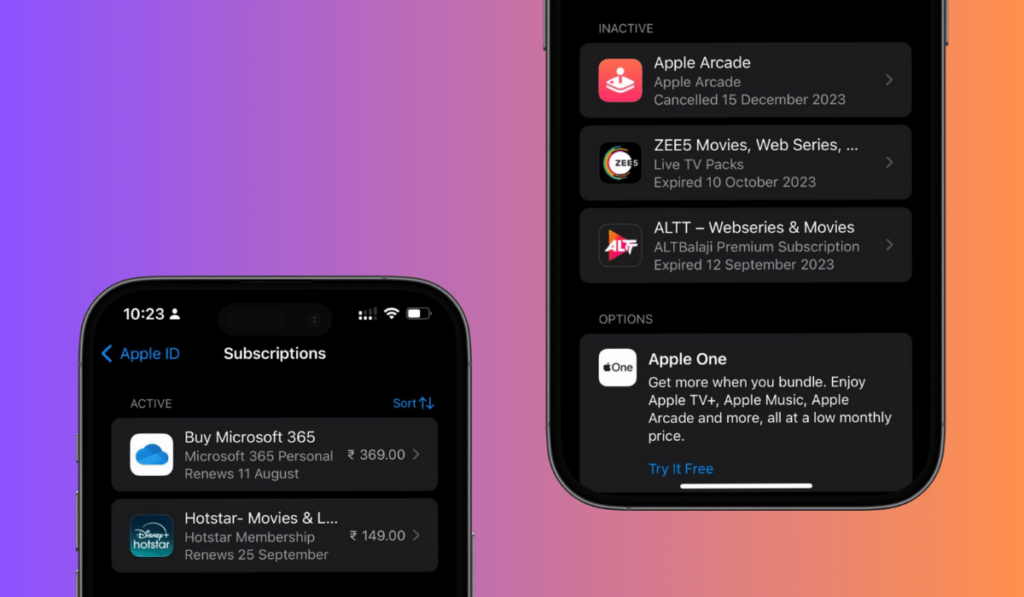
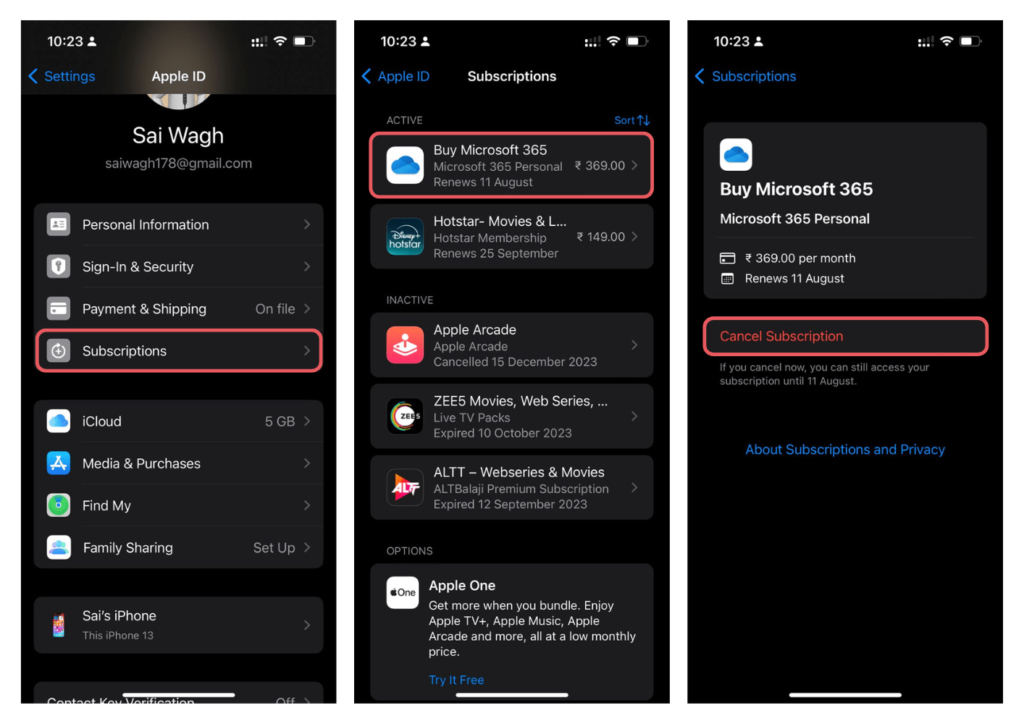
Keep your Apple ID and password at the ready for a smooth ride. To ditch a subscription on your iPhone or iPad, navigate to the Settings app. Tap on your personal space at the screen’s peak – the one with your picture and name. Dive into “Subscriptions” to explore your active and expired commitments. Select the subscription destined for the chopping block and hit “Cancel Subscription” or “Cancel Free Trial.”
Make sure that you have your Apple ID and password ready before you follow the steps.
To cancel a subscription on your iPhone/ iPad,
- Open Settings
- Tap on the “profile” icon that appears at the top. This section has your details like Name, Photo, Apple ID, etc.
- Choose Subscriptions. A section with your active and expired subscription will appear.
- Choose the subscription that you want to cancel, or no longer need. Next, tap on “Cancel Subscription” or “Cancel Free Trial”.
And you are done! You will no longer receive sms/mails from the particular website now onwards.
How to Cancel Subscriptions On Mac?
- Go to the App Store. Select your name in it.
- Tap “Account Settings”. If you are not signed in with your Apple ID, you will be first asked to login with the same.
- Next, find and choose the “Subscriptions” option in it.
- Select “Manage”. A list of the active and inactive subscriptions will now appear.
- Choose the subscription that you want to stop further and select the “Edit” option beside it. Next, click “Cancel Subscription”.
Congratulations ! You have fully unsubscribed from the unwanted mails and text messages.
Also Learn , Reactivating Subscriptions
Many times you want to unsubscribe to a subscription’s constant nagging for a temporary basis. But, because there is no such timeline set for your cancellation. You will have to re-activate on your own.
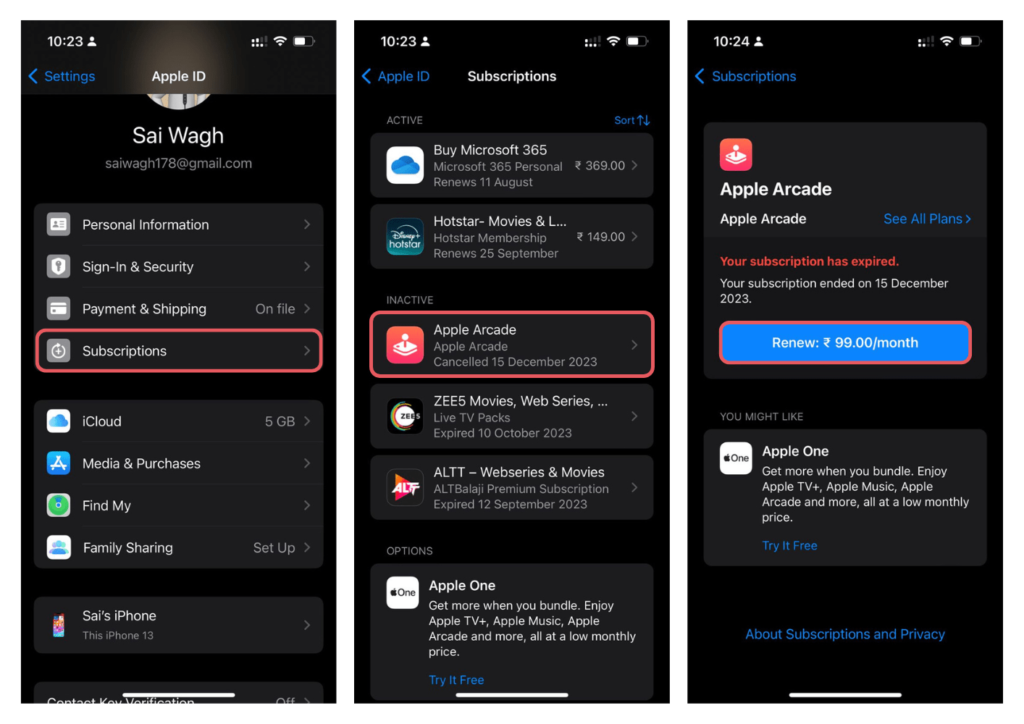
If you want to reactivate a subscription on your iPhone, IPad or Mac, you have to simply follow the same steps as you did to cancel the subscription with a minor change.
- All you have to do is open the Settings in your phone.
- Select your Profile icon or, sign in with your Apple ID if you haven’t.
- Go to “Subscriptions”. The same list of active and inactive subscriptions appears.
- This time, go to the inactive list of subscriptions
- Choose the one you want to reactivate/renew. You will see the option to renew or restart it again.
Managing Your Subscriptions Is A Financial Gain
Balancing out your iPhone, iPad, or Mac subscriptions is the key to safeguarding your wallet.
Yes! That’s no joke.
Regular audits of your subscription series history can prevent unexpected financial drains. Beyond the simple act of canceling or reactivating, there are strategic methods you can go for to manage your subscription.
For instance, enabling “Renewal Receipts” within the Subscriptions settings generates a digital record with each subscription renewal. These receipts, appear under the “Purchase History” section in your Apple ID settings (accessible via “Media & Purchases”)
Also, garnering automatic receipts is also a key-method to the same.
In conclusion, by taking control of your subscriptions and by learning how to manage them and cancel them when required, you’re not just saving money; you’re also simplifying your financial life.
Read more:
How to Set Up Speed Dial on Your iPhone
How to free up space on your iPhone (6 easy ways)
How to Easily Turn Off Meta AI on WhatsApp, Instagram, and Facebook
